
When converting our van from scratch, one of the biggest worries I had was how to create a campervan water system.
As our plan is to live in the van full time and eventually drive around the world, we wanted a system that allowed us to easily go about as many day-to-day tasks as possible.
Including showering, washing dishes and going to the loo.
So here are some of the requirements our system had to meet:
In the end, we got all of this and more!
In fact, our water system is definitely one of the best parts of our entire van build.
Sure, there’s been a few teething problems, but across the board it has held up well.
Below you can see the exact campervan water system we have in our van ...
I will try to make this as straightforward as possible, so let’s work in order.
First up, you need a way to store water. You have 2 options here:

We went for option 1 and decided to store our water tank inside of the van.
Simply because it was easier to set up and we didn’t want to have to work out issues such as how to stop it from freezing.
That being said, some point in the next year I would like to move our fresh water storage tank underneath the van.
There are ways to deal with the issue of freezing (such as 12v heat pads) and it would be nice to be able to store more water when travelling for longer road trips.
But for the sake of this post, let’s look at our current setup which requires a 70 litre Fiamma water tank.
These seemed to be the go-to choice as they are incredibly versatile, meaning they can be positioned any way up and can be custom-suited to your setup.
They come with everything you need in order to mount it, though I would say that the instruction manual is pretty much useless.
Side note: You may also want to check out a wheel arch water tank as an alternate solution
This depends entirely on your chosen setup, just be aware that the ideal pump points are located in those spots where the hole recesses slightly.
For example, here’s the position we went for …

You could choose to put this pump point halfway up the tank, all you would then need to do is install a piece of hose inside of the tank that touches the bottom, so draws all of the water out.
Be sure to face the black inside nozzle upwards.
Sure, it means you don’t get every ounce of water in the tank, but what it does mean is that it avoids you sucking up small waste particles into your system.
We initially had it facing down but, after altering the system with my dad (who is a plumber) he advised having it facing down as this is how they do it in domestic water setups.
Another update we had to make after our 2 month Scotland road trip, was switching out the plastic fittings for brass plumbing ones.
The plastic feed point started leaking slowly and no matter what we did we couldn’t get it to stop.
If you take the plastic fittings to a plumbers merchant then they should be able to give you a brass alternative as the sizes are all very standard.
You will need a few things here …

The campervan water pump is necessary to pump water throughout your entire system.
We opted for the 30PSI Shurflo 12LPM pump and it has proved excellent.
Shurflo are possibly the top recommended brand here, and offer a whole range of pumps.
30PSI is quite a high pressure, and it means you get good solid water flow throughout the van.
But any higher would have been too much for our campervan water heater; so be sure to check your chosen appliances to ensure your pump isn’t too much for them.
If your pump is too strong, then it can blog the components inside of different appliances which is a very costly mistake to make.
The water filter screws on in front of the pump, so cleans water before it passes through the pump. I’m grateful we picked one of these up as, after cleaning our just a few weeks after use I discovered it was full of blue shards of plastic I forgot to properly clean out of the water tank upon installation; it’s a good thing these didnt get sucked through our whole system!
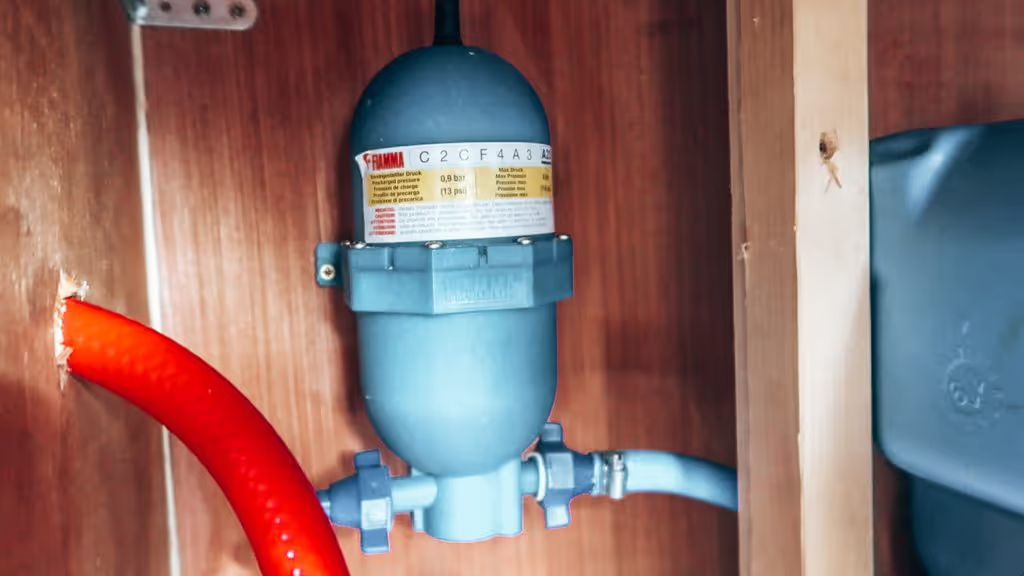
The accumulator connects on after the water pump and it avoids surges in water and allows for a nice consistent flow.
Basically, it stops that sputtering that happens when you turn the tap on and air is struggling to escape through the system.
The Fiamma accumulator seems the most popular so we opted for that, and again it’s proved perfect.
One tip I did pick up online was to not fiddle with the settings on this at all. Leave it as it comes in the box.
12mm (1/2inch) food grade ID hose is the standard size, necessary for pumping water throughout your system.
By the way, ID means Internal Diameter.
I bought mine here
It’s useful using red and blue, especially in dealing with fixes in the future.
The other option is to go for flexible push fit hose, which would then require push fit fittings instead of jubilee clips.
If I was to redo our water system I would definitely look down this route.
On top of this 12mm hose, you’ll also need a metre or two of 40mm ID food grade hose for filling the tank, as well as another couple metres of 10mm ID hose for your fill level / air pipe.
These are what you use to connect different pieces of hose when diverting water flow.
The amount you need of each will depends on your van plumbing setup.
For us, we have a T piece diverting the cold feed into the Malaga, as well as two Y adaptors when diverting the cold and hot feed on towards the sink and the shower.
For 12mm hose, you need ½ inch adaptors and for the 10mm ID food hose you need 3/8inch ones. We bought ours from a local marine store as I couldn’t find links to them online.
For some reason, these didn’t come with the water pump so we had to pick up two more. The cheapest place I could get them was through Amazon for £12 ($15), which seemed like a rip-off but we didn’t have much choice …
We use these to pin the water pipes in place.
Okay, so you’ve got your fresh water and can now pump it through the van. Next up, you’re going to need some sort of campervan hot water system.
There are all sorts of water heating systems out there, some that store water and heat them inside a giant tank, and others that I think just heat water as it passes through.
I don’t have much experience with the latter as we opted for the Malaga 5E which has a 13 litre capacity.
Meaning it heats up this full 13 litres when switched on, and then that will need to do you before reheating another batch.
Based on experience, I can highly recommend the Malaga as it heats water in as little as 15-20 minutes if you opt for both 240v and gas heating.
Under just 240v it can take up to an hour and, unless you’re plugged in at a mains outlet, will drain your leisure batteries like crazy and put a lot of pressure on the inverter.
We usually opt to heat in just gas which takes around 20-25 minutes to get the full 13 litre tank to near boiling point.
This is enough water for a shower each and plenty of hot water to wash the dishes.
It’s worth noting that we did have some issues with leaking from our Malaga; and it’s a shame that the installation guide didn’t include advice on how to prevent this. But hey ho, here’s what we found …
BEFORE installing the Malaga in your van, unscrew the black fittings that your hose connects onto.
Wrap some PTFE tape around the ends and then do them back up nice and tightly.
For us, the cold feed leaked slowly a number of times, and fixing this when it’s already screwed down and mounted is an absolute nightmare!
Secondly, if you plan on using the same food grade hose as us, then these black fittings are no good.
Instead, you need to also buy 2 of these fittings here from the Propex store.
Go ahead and wrap PTFE tape on the blue end and insert as normal. And then the barbed end creates a proper seal when you attach a jubilee clip over the hose.
Since doing this we have had no issues, whereas before we had small continual leaks every other day. Which makes sense now looking back on it!!!
The most important thing here is to read the manual (online link) and decide if you realistically have space to install one in your van.
It needs to be securely mounted and have suitable access space on each side and above.
More importantly, there needs to be a flat piece of panel on the outside of the van for you to fit the plastic vent.
If you are installing one in a LWB van, like a Sprinter or Ducato/Relay/Boxer, then there are surprisingly limited places you can actually install it.
We had already installed the majority of our vans components by this point, and were extremely lucky that it was even possible for us to fit it where we did.
In the end, I spoke to a local gas engineer who later pressure checked our gas system, who advised us on the best place.
One important thing to note is that it can’t be installed behind the sliding door as the vent gets blocked when the door is open.
Also, it needs to be in a sealed box with a drop vent. That way, if there is a gas leak at the joint, then gas won’t seep into the living space.
Finally, be sure to pic up some 5mm ID hose which can then be used to drain the tank when not in use. Again, it would be very simple for this to be supplied with the Malaga, but of course, they don't!
You have two electrical looms that come with the Malaga, one 240v supply and one going to the control panel.
It’s straightforward enough connecting each to the Malaga, you just need to unscrew the metal panel on the front and check the user manual for the correct spot to clip each in.
Then, just run the control panel loom to an easy access point. Ours went alongside our main control panel which is home to all major appliances in the van,
The 240v supply is a little trickier, and I wouldn’t want to offer any advice here as our auto electrician connected ours for us.
It passes through a changeover switch which allows us to either run it through the inverter or through the shore hookup when connected at a campsite.
Tip: You can read more about this in our campervan electrical system guide.
Installing the gas is straightforward, there is a very clear point to connect onto, and we have an elbow going straight onto it.
Again, it’s best to have a professional do your gas work, or at the very least pressure test the whole system.
This is a legal requirement for insurance purposes and doesn’t cost that much to do. It’s also the only way to be sure you’re not likely to die of a gas leak one day!
We redid our entire gas system after two months and decided to install a 3 way manifold, which means that our water heater now runs on its own pipeline so can easily be shut off in case of any issues, without messing up our entire gas system in the van.
For fittings, I recommend proper 8mm compression gas fittings from Wade, which can be bought from BES.
Further Reading: For more help with this, check out my in-depth guide on installing a campervan gas system.
The Malaga 5E is an expensive piece of kit, costing us £420 in total; far more than we ever imagined one would cost!
However, it is widely regarded as one of the best water heaters available in the UK. Perhaps second only to the Truma combi system which runs on diesel.
This looks AWESOME and is a 2-in-1 system that does your air heating as well as your water heating.
If we had the budget, then we probably would have gone for this.
It’s possible to buy a range of electric water heaters, such as these ones from Propex.
Based on experience, I imagine they put a lot of strain on your electrical system so if you can get a gas heater instead, that may prove best in the long run.
After all of this technical messing around, all you are actually trying to do is get hot and cold water to come out of your taps and shower!
It seems like such a simple daily activity, you switch on a tap and there the water is. I never knew how complex and expensive it can be to get to that point!
Well, in the end, it all comes down to these two areas ...

In most campervan conversions we come across, people opt for small kitchen sinks without a draining board.
And many of these can then be filled over with a piece of wood to create one continuous piece of work surface.
Sure, in pictures and whatnot this looks nice and tidy, but it seems totally impractical to me!
In particular, not having a draining board.
As I do the washing up (Cazzy cooks) I have a pet peeve about drying up immediately after.
Instead, it just makes more sense to me to stack dishes on the draining board and let them dry themselves, ideally overnight.
Well, I absolutely LOVE our sink! It’s the biggest one we could get to fit the space, and is actually quite shallow compared to the majority of household sinks.
We bought this one here from Screwfix and it’s absolutely perfect for our needs!
As well as the sink itself, here’s what else you will need to get a functioning sink …
This is perhaps my favourite part of the entire van.
I am so chuffed with how it turned out, and super impressed that we haven’t had a single issue with leaks or anything!
Not bad for someone who literally didn’t have a CLUE what he was doing the whole way through!
In fact, we weren’t even sure how the finished shower would work or look until about 10 weeks into the build.
All I had was a rough idea of where we knew it would be and where the hot and cold feeds would be coming out in the kitchen area.
In order to feed hot and cold water to the shower, we have 15mm push fit pipe running through the ceiling, all tucked behind the cladding.
In order for the shower to work, water literally gets pumped over our ceiling!
And it all works through pressure from our 30psi Shurflo pump. Sure, the water pressure isn’t what you would get in a house, but at the end of the day this is a good thing as it prevents water wastage.
It works through a basic thermostatic bar mixer that adjusts the mix of hot and cold water to your required temperature.
Here’s all the bits of kit we bought for the shower unit itself …
The shower itself ended up looking really good, and we are very happy with it.
In terms of space, we really weren’t sure how much room we would have for the shower, so simply bought the smallest possible tray we could get. Which was this one from Jacksons Leisure which is 58.5 x 58.5cm.
In the end, it is as if we calculated it to perfection!

The shower fits in with precision and couldn’t have been a cm bigger or smaller; funny how things just work themselves out sometimes!
It’s perfectly big enough for me and Cazzy, any bigger would take up unnecessary space.
It’s also the perfect size to fit in our Thetford 365 Porta Potti, which again I highly recommend as one of the best campervan accessories you can buy.
To support the shower tray, there is a square of 6mm plywood under the base and 4x2s around the edges to support those.
The rear wall of the shower is made up of 3x2 stud work (way over the top) covered in 6mm ply; and the side walls are made of 12mm plywood.
To make it waterproof, the whole thing is covered in 5mm PVC cladding from DBS Bathrooms.
The ceiling is white PVC cladding and I used sanitary sealant to waterproof all of the joints.
We picked up a cheap towel rail and toiletries holders from a local store, and made sure they are fixed with plugs so they can be easily removed without damaging the cladding.
For the shower curtain, we bought a full-sized world map shower curtain off Amazon and trimmed it down. Funnily, this seems to get more compliments than most other parts of the van!
To finish off the edges of the shower and to better waterproof, I picked up some PVC corner trim from Wickes.
The water you have left from your sink and shower is known as “grey waste” and there are disposal points for this all over the UK and Europe.
So to avoid just dumping this straight out under the van, we decided to pick up an underslung 50 litre waste tank.
For our DIY grey water system, we bought this under van water tank from CAK tanks and it’s custom designed to fit the chassis of Peugeot Boxer vans; so installing it is as easy as possible.
It’s a case of drilling 4 holes in the chassis runner brackets under the van and putting some hook bolts inside.
These then pin the tank up under the van using two thick metal bars; and so far I can report it’s worked perfectly.
One of the issues you have with water being stored under the van is freezing.
So help combat this, and to protect the tank, we wrapped it first in leftover foil insulation.
It’s held up well, however the issue is that when in Scotland on our North Coast 500 road trip, the water still froze in places so we couldn’t drain it.
I’m inclined to believe that it happened in the waste water drain tap coming off the tank. So in the long run, we’re going to have to engineer something slightly different for times that we are in cold climates for long periods.
Other than that, it’s worked great.
It’s fed from the sink and shower through a 3/4inch waste pipe that connects up using a Y connector shortly before it reaches the tank.
At the top of the tank is an air valve that allows the tank to fill and air to release; and also acts as an overflow in case it gets too full; which is handy as it stops your shower or sink from backing up and overflowing!
There is a third hole at the base that has a 3/4inch waste pipe leading to a drain valve pinned to the lip of the van on the driver’s side.
Simply twist this and the waste water empties out … simples!
This is pretty simple as the waste tank sits not far from the shower drain.
We picked up one of these 3/4inch drains off eBay, and the waste pipe pins perfectly to the bottom, and then the upper edge seals inside the shower tray.
If we ever had to replace this pipe, then I must amidst that it will be a bit of a nightmare, but I’m not sure if there is any way around it.
One issue I thought we would have is from waste tank smells coming up and into the van through this drain, but this is certainly not the case.
This was a lot more complicated to work out!
Again, I have ZERO experience with how kitchen drains work, and there is no obvious choice out there for specialised sink waste systems for campervans.
I guess it didn’t help that the sink we have is for a standard household kitchen!
So the solution we came up with required a little but of ingenuity and tinkering.
As you can see in the picture below, we have a waste fitted directly under the sink, which stops bad smells from coming up.
We opted for this one from Screwfix as it was the shortest we could find; if it hung any lower it would take up too much space under the sink.
The issue is that, when water leaves the trap it would usually go into a much thicker pipe before heading to your home’s mains drainage.
In our case, we had to find a way to drop this size down to 3/4inch waste pipe.
So, what we did was picked up this hose connector from Screwfix which is usually meant for draining washing machines I think.
It attached perfectly to the end and allows you to fit the waste pipe straight on! From there, the pipe heads straight out under the van, and then is attached under the van with cable ties before making its way into the waste tank.
Again, I wasn’t sure how this system would hold up in the long run, largely because of how far I knew the water would need to travel before it reached the sink.
But after 4 months of use (as of writing) it is perfect!
I emptied out the trap after 3 months and there was some buildup of food particles.
I am very careful not to let any large bits of food fall through the sink as I’m worried that over time this will cause issues.
To be honest, I am fully expecting the pipe to get blocked at some point in the future, but so long as this setup lasts for a year or more, before simply replacing that piece of pipe, I will be extremely happy!
As much as possible really! However, you need to carefully weigh up how much you realistically need as well as how much weight you can afford to carry.
We have a 70 litre fresh water tank, as well as three 5-litre containers for drinking water.
We find that this lasts us 4-6 days, depending on how many showers we take in that time.
Our water heater also has a 13 litre capacity, so in reality we actually carry 98 litres of water when full.
If you plan on going to some really remote locations, and can’t fill up water for a week or more at a time, then you may want to look at 150l+ systems.
The easiest and driest way to fill a campervan water tank is through an external fill point on the side of the van. Simply attach a hose and away you go.
However, hose points are not always accessible, so it’s useful carrying some large water containers so that you can manually fill these and deposit them into your tank.
Wherever possible, you should take steps to dispose of your grey waste water appropriately. I can’t speak for every country, but in the UK it is generally encouraged for you to dispose of grey water at campsites or service areas with dedicated dumping points.
Strictly speaking, grey waste shouldn’t contain anything too harmful in it, but use your discretion if your tank is full and you do need to dispose of it. For example, don't dump 50 litres of grey waste in a public car park!
The only black waste you get in a campervan is from your toilet.
And the answer here is a resounding NO. You cannot dump black waste anywhere in any country.
It’s actually a huge problem now, vanlifers dumping their toilet waste in bushes or down drains in the street.
This is not only really bad for the environment, but is a disgusting eyesore, so please don’t do it.
Instead, dispose of your black waste appropriately, at motorhome service points or at a campsite.
Campervan showers work in a similar way to normal household showers, except the water pressure is usually much lower so as to preserve water.
It is entirely possible to install a shower inside of a campervan, just be careful to test frequently during the install to ensure there are no minor leaks along the system.
Also, ensure the shower area is fully sealed at any joints, as over time a leaky shower can cause serious issues to your campervans structures.
Many vanlifers opt for an external shower that pins to the back door of a van; and you can even install a shower curtain for extra privacy.
There are tons of great places all around the world to fill up your campers fresh water tank, including …
Just check permission if you aren’t sure whether a water tap is for free public use or suitable for drinking.
As long as all the components in your DIY camper water system are “food grade”, then yes it is possible to drink straight from the tap.
Of course, if you fill up regularly from fill points all over the country and with different hoses, there is a good chance of your system becoming slightly contaminated; so be sure to drain and clean your system regularly.
Alternatively, you could do what we do which is have separate 5 litre bottles that we use for drinking water (unless we are boiling first).
If you aren’t planning on using your campervan for a few weeks, it’s best to drain down the entire system.
Especially if the van is in a very cold climate. Water will expand as it freezes and can break fittings and components; which is an expensive and time consuming thing to fix!
Absolutely! Just ensure that it is properly sealed at all entry/exit points and that the tank is fastened in place securely.
I would imagine that a large water tank can become more of an issue as it starts to empty and water is continually sloshing around when driving.
Think of it this way … a 70 litre water tank weighs roughly 70kg. The last thing you want is a 70kg weight ripping loose when driving!
My number one piece of advice here would be to think carefully when designing your van as to how your water system will run.
I never gave it enough thought early on, and that made for some very stressful days towards the end of the build.
In the end, I received a lot of very useful advice from a family friend, so thanks again Chris!
If you know a plumber, then it could be worth speaking to them when setting up as, after all, they do this for a living and can probably help you out immensely!
Other than that, I don’t have much more to add.
Hopefully this guide has been useful, and if you have any questions just drop me a comment below and I will help where possible ...
More campervan guides:


Leave a comment
Let us know what you think!